Process Tools - Overview
Overview
Process Tools serve as the central intelligence in a workflow. Their primary function is to handle the image data obtained from input tools, analyse the input data along with user instructions, and subsequently make decisions. These decisions can then be utilised to trigger specific actions or processes. In essence, Process Tools act as the critical components responsible for processing information, interpreting instructions, and facilitating the overall flow of operations.
Common Tool Settings
Colour Thresholds
Specify the colour ranges to be filtered. A colour range is specified using the Hue, Saturation, and Value (HSV) colour space, Grayscale colour space (GRAY), or CIELAB colour space (CIELAB). The following settings are available for colour thresholding:
HSV Colour Space
HSVHue: The "angle" of the colour on the colour wheel. The range of Hue is from 0 to 180 degrees.
- Saturation: The "purity" of the colour. The range of Saturation is from 0 to 255.
- Value: The "brightness" of the colour. The range of Value is from 0 to 255.
Grayscale Colour Space
GRAY- Grayscale: The "brightness" of the colour. The range of Grayscale is from 0 to 255.
Gray Threshold Method
GRAYThe method used to determine the threshold value. The following methods are available:
- Normal: Applies a fixed threshold value to the entire image based on pixel intensities.
- Adaptive: Calculates threshold values locally for each pixel, considering variations in image intensity.
- Otsu: Automatically determines an optimal threshold by analysing the image histogram to minimise intra-class variance and maximise inter-class variance.
Gray Threshold Types
GRAYThe thresholding method used to convert the grayscale image to a binary image. The following thresholding methods are available:
- Binary: If the pixel intensity is greater than the threshold value, it is set to 255, otherwise it is set to 0.
- Binary Inverted: If the pixel intensity is greater than the threshold value, it is set to 0, otherwise it is set to 255.
- Truncate: If the pixel intensity is greater than the threshold value, it is set to the threshold value, otherwise it is left unchanged.
- To Zero: If the pixel intensity is greater than the threshold value, it is left unchanged, otherwise it is set to 0.
- To Zero Inverted: If the pixel intensity is greater than the threshold value, it is set to 0, otherwise it is left unchanged.
Adaptive Block Size
GRAY - AdaptiveThe size of a pixel neighborhood used to calculate the threshold value for the pixel. The following block sizes are available:
- 3x3
- 5x5
- 7x7
Adaptive mean subtract
GRAY - AdaptiveThe constant subtracted from the mean or weighted mean. Normally, it is positive but may be zero or negative as well.
CIELAB Colour Space
CIELAB- L: The lightness of the colour. The range of L is from 0 to 100.
- A: The colour component ranging from green to red. The range of A is from -128 to 127.
- B: The colour component ranging from blue to yellow. The range of B is from -128 to 127.
Tips
Zene UI

In Zene UI the user can add more than one colour range by clicking the + button at the bottom. To remove a colour range click the bin icon.
Morphological Operation Settings
Morphological Operation
Specify the morphological operation to be applied to the binary image. The following morphological operations are available:
- Erosion: Erodes away the boundaries of foreground object.
- Dilation: Increases the white region in the image or size of foreground object increases.
- Opening: Erosion followed by dilation. Useful in removing noise.
- Closing: Dilation followed by erosion. Useful in closing small holes inside the foreground objects, or small black points on the object.
- Gradient: Difference between dilation and erosion of an image.
- Top Hat: Difference between input image and Opening of the image.
- Black Hat: Difference between the closing of the input image and input image.
Structuring Element Shape
Specify the shape of the structuring element to be used in the morphological operation. The following structuring element shapes are available:
- Rectangle: A rectangular structuring element.
- Cross: A cross-shaped structuring element.
- Ellipse: An elliptical structuring element.
Structuring Element Size
Specify the size of the structuring element to be used in the morphological operation. The size of the structuring element is specified using the width and height of the structuring element. The options available are:
- 3x3
- 5x5
- 7x7
- 9x9
Detected Object Transformation Contain Settings
Contains the configuration for transforming a detected primary object into another object based on whether other objects are within the primary object.
Detected Object Label
The label of the detected primary object. This is the object that determines the boundary where other objects are checked to be within.
Detected Object Contain Labels
The labels of detected objects that are within the primary object. All of which are used to determine if the primary object is to be transformed.
Comparison ROI Position
The position to determine if the detected objects are within the primary object. The following comparison ROI positions are available:
- Total: All the points of the detected object must be within the region of interest.
- Top: The top point of the detected object must be within the region of interest.
- Centre: The centre point of the detected object must be within the region of interest.
- Bottom: The bottom point of the detected object must be within the region of interest.

New Object Label
The label of the new object to be transformed into.
Detected Object Information Label
The label of the object which the new object's information is based on (e.g. detected points, etc.).
Mark-up Text Input - UI
Mark-up text input is a text input that allows the user to add mark-up text to the text. The mark-up text is enclosed in ^< and >^, with a function name and a parameter in the middle.
^<FUNCTION_NAME({PARAMETERS})>^
See Text Markup for more information.

Above is the example of a single-line text input with mark-up text.

Above is the example of a multi-line text input with mark-up text.
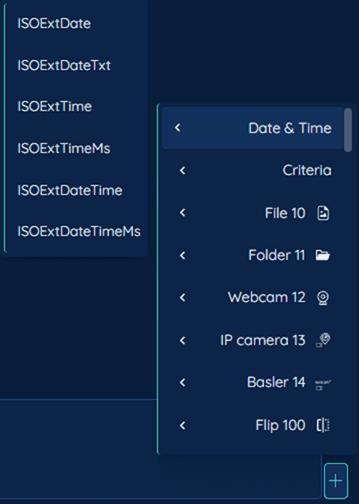
To add mark-up text to the text, click the + button and select the mark-up text from the menu. The menu will show the type of markup available from the tools or other sources.
To remove the mark-up text, just erase the mark-up text from the text input.

The mark-up text will be added to the text input.
In the example above, the mark-up text ^<DATE_TIME("ISOExtDate")>^ will be replaced with the date of the current day in the format of YYYY-mm-dd.
Deep Learning Tools
Model Folder Structure
The model folder should contain a model file, a config file, and a labels file.
model_folder
├── model_file
├── config_file (not always required)
└── labels_file
Only one (1) file of each type is allowed in the model folder and those model files must come from the same source. Otherwise, Zene will not be able to determine which file to use.
For example, if the user have two model files in the folder, Zene will not be able to determine which file is the model file.
Model File
The model file is the file that contains the model. The model file can be in one of the following formats:
- .pb: TensorFlow 1 frozen graph model file.
- .onnx: ONNX model file.
- .weights: DarkNet model file.
Config File
The config file is the file that contains the model configuration. The config file can be in one of the following formats:
- .pbtxt: TensorFlow 1 model config file.
- .cfg: DarkNet model config file.
Some models do not require a config file. For example, ONNX models and some TensorFlow 1 models do not require a config file.
Labels File
The labels file is the file that contains the labels for the model. The labels file can be in one of the following formats:
- .txt: Text file containing the labels.
- .json: JSON file containing the labels.
- .names: DarkNet text file containing the labels.